Pages

Tuesday, December 13, 2016

Oven baked Lechon Belly


Nothing excites a Filipino party goer more than seeing a lechon on the table. The king of  a buffet throne, the crowned jewel and the Belle of the ball . It's  the epitome of the Philippines' festivities . 


The whole roasted pig, glistering in its own fat with the aromatic steam seeping between the crackling skin , watering mouths, wowing eyes and promising heart -clogging goodness  .


 Now that Christmas is at our doorstep and everyone feeling all jovial and festive, pictures of it is all over the Internet , ever present in many ,many celebrations and parties. As a matter of fact, every December , my hometown even celebrates a food Festival dedicated to this Filipino specialty.

Behold! The Lechon Festival!

I feel home sick and left out just by looking at it and  grease- stained smiles of those who had it. Since I can't possibly order a whole pig and my oven in nowhere near big enough to accommodate a whole swine, I decided to make a smaller but never the less just as delicious version using just the pork's belly. 


It was my first time making  Lechon at home and I was pleasantly surprise that it turned out so good. The skin was so crispy , it stayed crunchy  the next day! The best part is, it tasted of home. This is going to be a very merry Christmas after all. 


Just listen to this crackling sound. It's almost as good as listening to Christmas carols.


Friday, December 2, 2016

Triple Chocolate Brownie

I once came across a rather heated discussion about how Brownies ought to be.  Crumbly or Chewy?  It's astonishing how passionate  some people can get when it comes to their food. 


It reminds me of how Jamie Oliver almost  started civil war in Spain after adding chorizo to his  Paella and tweeting about it.  Fortunately for me, being a mere mortal/unknown blogger, I do not fear being the receiving end of somebody's wrath  for bastardising a national dish. (^_^)


So back to the Brownie question. Crumbly or chewy? To compromise,  my friends , is the key to good foods and world peace. Why settle for one gustatory gratification when you can have both? Take this brownie recipe for example, the sides and top is both crumbly and crisp, yet once sliced, it is a gooey, fudgey and chewy. The best of both worlds.

Ingredients:

250 g dark chocolate
200 g butter
50 g coconut oil
3 eggs
200 g brown sugar
50 g white sugar
1 tsp. vanilla
130 g flour
30 g cocoa powder
3/4 tsp. baking soda
1/2 tsp. salt
150g  of your favourite, chocolate chip 


 Whisk together eggs, white and brown sugar and vanilla until well combined


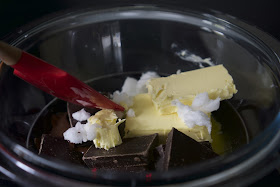
 Put a heat-proof bowl over a pot of steaming water. Melt butter, coconut oil and chocolate together. Once chocolate mixture is smooth and lump-free, take bowl from the heat. Rest for 5 minutes.

 Whisk egg mixture into the chocolate mixture.

 Sift flour, cocoa and salt and fold into the chocolate mixture .

 Add in the chocolate chips. Stir! Stir!Stir!


Bake in a preheated oven ( 180°C) for 20 minutes.
Allow to set for about 20-30 minutes before slicing.


Best eating warm as it is or with a scoop of your favourite ice cream and sauce. Yum!


Monday, November 21, 2016

Buko Pandan

Tropical fruits and vegetables are appearancing at our local supermarkets . To my delight,  cassava , bak choi , mangosteen, Asian mangoes   her!her!her! okra ( Although I hate it, I'm just happy to see it. It's like meeting your least favourite relative in a foreign land when you're 
homesick! (^_^) , dragon fruits and rambutan are now displayed right along local grown potatoes,  apples, berries and pears.


I was almost skipping with happiness when fresh young coconut decided to join in! Probably the most Instagram-ed fruit or nut ( ?)  while  holidaying in the tropics.  Now, I don't have to buy plane ticket or  cross the continent just to sip that sweet, vitamin- rich coconut water!


The only downside of having this exotic treat here is the sky- high price that came with it. Coconut are literally growing like weeds in our farm in the Philippines, buying one for almost 5 Euro a piece is both dismaying and discouraging. On the other hand, a plane ticket back home cost more than a grand, so I went off and bought few of these precious fruits or nuts ( ?) !

I have been dreaming of making  Buko Pandan for years! Now, I finally got the chance to make it from scratch ! Preparation is so easy, anyone can make it with one hand tied behind their back! Let me show you how!  4 Thai young coconuts gave their lives for their recipe. I would have massacred a whole bunch but it's  too expensive and my conscience is just against it.   

Ingredients:

 shredded young coconut meat
1 pack Pandan gelatine  aka Gulaman
3 tbsp. sugar
400 ml coconut water
1/3 cup Pandan Tapioca pearls aka Sago 
500 ml  water
3 pandan leaves, tied into a knot
200 ml all purpose cream
180  ml  condense milk


Let's get cooking!

Bring coconut water and sugar into a  gentle boil. Add pandan flavoured gelatine. If you don't have it, just use a pack of regular jelly and add few drops of green food colouring to it. Pour mixture into a container. Allow to set. You can pop it in the fridge to speed up the process. 

Put 2 cups of water in a pot. Add pandan leaves  and bring it to a boil. Add tapioca pearls ( the pandan flavoured or green ones, if you could find it).  Cook until almost translucent . Takes around 12-15 minutes. Strain, discard pandan leaves and transfer cooked tapioca pearls in a  large mixing  bowl.


Add your coconut meat(  I like large strips of coconut for extra bite but you can shred it finely too. ). Add in cream and condense milk. If you prefer sweeter dessert, feel free to add more condense milk into the mixture. 


Gently stir all the ingredients until well integrated.


Cut pandan jelly into cubes.

Add into the buko mixture. Toss gently. Refrigerate for about 4 hours. 


Serve cold and do enjoy life's simple pleasures.


Friday, November 11, 2016

Meat Buns

FF ,  his dad, along with his brother and an uncle went on a  4- day- trip . This Gentlemen  Tour became a yearly tradition and yes, the wives are not invited. They left Friday afternoon and came back Monday night, somehow taking 4 days of sunshine with them. Looking at the pictures FF sent  me, it seems like they are having a daily dose of Vit. D , thanks to Portugal's warmer temperature this time of the year. On the other hand,  my corner here in Germany was bleak, rainy and yup, pretty depressing. I literally haven't seen the sun shining this weekend!
So while FF and the boys are having a blast in another country, watch football live, drink enough alcohol to blow their livers to the size of Texas, I was stuck alone at home, with nothing but mountainous laundry to wash and iron and a dirty house to keep me company.

Fortunately, my house is not palatial and in a matter of hours of cleaning and tidying up, it was looking rather speck and shiny.


To keep my mind off boredom and myself from talking to the mirror, I decided to be busy in the kitchen . I haven't baked bread in years so why not do it now? I did remember that my Baked Siopao  recipe was quite popular post in this blog, so I went off and do it again.


 This time,I am  using a completely different recipe. Don't get me wrong, I was happy with that recipe, the buns,  when taken out fresh from the oven was smooth a baby's bottom. I did remember though, that once cold, it turns as wrinkly as a granny's armpits. Not pretty. Nope. not at all.


Then a colleague from work recommended this bun recipe. After a bit of modification, it turned out- perfect! Unlike my first siopao recipe which was flat, the buns are plump looking , just as smooth, has a nice almost crunchy bite to it yet fluffy in the middle. 


I gave a bunch to my neighbours since I can't possibly eat them all. Baked it late afternoon and save 2 for dinner. The buns did not become soggy at all. It stays as tight as Demi Moore's forehead. This recipe is a keeper.


The Perfect Buns
600 g All purpose Flour ( Mehl 550 in Germany)
8 g salt
200 ml warm water
4 tbsp. milk
35 g sugar
1 cube fresh yeast
80 g softened butter
1 egg

Egg wash:
1 egg
2 tbsp. water
3 tbsp. milk
2 tbsp. sesame seed


In a mixing bowl/kitchen machine , mix together warm water, milk, sugar and yeast . Cover and let it rest for 5 minutes until frothy .

Mix salt and flour together. Add into the yeast mixture. Add butter and egg.

 With dough hook attached, let the machine do the muscle work for you. Knead at max. speed for 5 minutes until dough comes together.

 Knead for 3 more minutes until roll into a ball.

Butter the mixing bowl and put dough in it. Cover with clean towel and let it rest in a warm place for an hour or more.


 Once double in size, punch dough down and knead for 5 more minutes.

  It should be smooth and elastic. Divide dough into two.

  Roll into a log and cut into portions.


Since I got all the time in there world, I channel my inner OC  and weigh each dough. I like my bun small, so 60 g is sufficient. If you want your buns bigger, use more dough for each bun. A hamburger size should be around 90 g.

  Roll each dough into a tight ball.

Flatten each dough into a disk.

 Add your favourite filling. This  Asado Filling is so good . I used pulled pork this time.

 Pinch seams together to seal the bun.


Let each bun rest for about 30 minutes. Preheat oven ( 200°c) for 15 minutes. Brush buns with egg wash. Sprinkle with sesame seeds and bake for 16-20 minutes or until buns turn golden brown .


Tuesday, November 8, 2016

Pulled Pork, my way

I have been wanting to try pulled pork since I saw a video of it on the internet.

This weekend, I finally got the opportunity  to give this dish a try.  

When FF went to Portugal for 4 days , he asked me to let some lights on at night to keep some unwanted visitors away. He assume that people who don't listen to Jesus,  would think twice before entering  a well-lit home . I played ''Home Alone''  over the weekend. To make my presence felt in our empty home, I let the light burn through the night and to eer double my security.  I slow cooked a kg pork shoulder for 12 hours , engulfing the whole house in this sweetish , barbecue smell.  The subtle  aroma  of cooking meat in the air screams Beware! Cook at work ,   don't intrude!  I was left undisturbed  through the nights and was merrily well fed during the day. FF also was happy to be welcomed  home by a healthy , sated wife and a plateful of pipping hot meat buns.


Making this recipe is very simple, though it took almost 2 days in the making. Perfect when you're bored and wants to kill some time.
  
Ingredients: 
Dry rub:
1/2 cup brown sugar
1 tsp. mustard seed
1 tsp. garlic powder
1 tsp. onion powder
1 tsp. sweet paprika
1/2 tsp. cayenne powder
1/2 tsp. cumin powder
1 tsp. pepper
1 tbsp. coarse salt 

Others:
1 kg pork shoulder
1 large onion, chopped
4 cloves of garlic, minced
200 ml pineapple juice
100 ml water
about 2 tbsp. Worcestershire sauce
3 tbsp. apple cider vinegar
a cup of your favourite barbecue sauce


 Mix dry rub ingredients together in a mixing bowl. 

 Wash pork shoulder and pat dry. Roll pork in the dry rub mixture until well coated.

 Transfer in a ziplock  bag or sandwich bag.  Seal bag and refrigerate for about 24 hours or more.


           Put marinated pork in the crock pot. Add chopped onion and mince garlic into the pot.


Add Worcestershire sauce, apple cider vinegar , pineapple juice and water. Cook meat and sauce in crock pot's ''low'' setting for about 10-12 hours. Again, each kitchen gadget works differently, check your pork after 6 hours of cooking. If it's tender enough then you can take it out of the pot. 

 Once the meat is cooked and fork tender, transfer into a big bowl, along with the cooked onion.Shred meat using a thong or 2 forks.

Add your favourite barbecue sauce. And it's ready! 
You can put in between burger buns,

in your sandwiches,


, in your pao


 or as a filling for your Meat Buns!